
Definitions:
Terminal: The terminal is your Ouch! clock system.
Region (noun): an area, or part of a location.
Messenger:
In Messenger, the regions are there to allow you to draw reports that only include transactions for specific terminals. For example, you would like a timesheet for all the employees that worked in the warehouse today, but not the employees who worked in the office.
The Regions part of Messenger is where you create the Regions.
Example:
Let’s pretend you own a farm. Some of the employees work at the Milking Shed in the mornings before going out into the fields, other employees work the whole day out in the fields.
The Milking Shed has only 1 Ouch! clock, which is fixed to the wall. However, there are numerous fields, and multiple portable Ouch! clocks that go out to whichever field is being farmed that day.
Let’s say you want to get a timesheet that only shows the times of the people who worked in the Milking Shed each day, and a separate timesheet that shows the times of the people who worked in the Fields.
In this scenario, you would set up the Region called “Milking Shed” and another Region called “Fields”. Then you would use the Terminal Linking Feature to link the Fixed Ouch! clock to the “Milking Shed”, and the Portable Ouch! clocks to the “Fields”.
Now when you draw a Regional Timesheet (in the Report Wizard) with the Region “Milking Shed” then only the people who worked in the Milking Shed will have times on the Timesheet. If you draw a Regional Timesheet with the Region “Fields” then only the people who worked in the Fields will have times on the Timesheet.
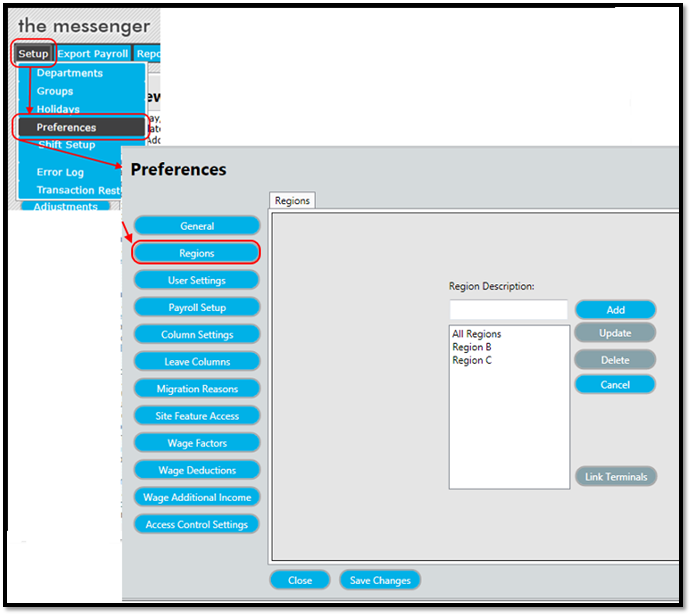
Regions can be accessed by going to the Main Menu of Messenger, then clicking on Setup and Preferences. Finally clicking on the Regions tab. (See Figure 1)
Figure 1
Comments
0 comments
Please sign in to leave a comment.